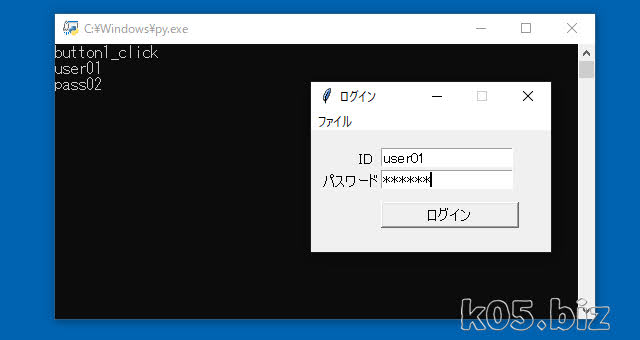
こんな感じのフォームをPythonで作成してみます。Tkinterを使いますが、標準で入っているライブラリーです。
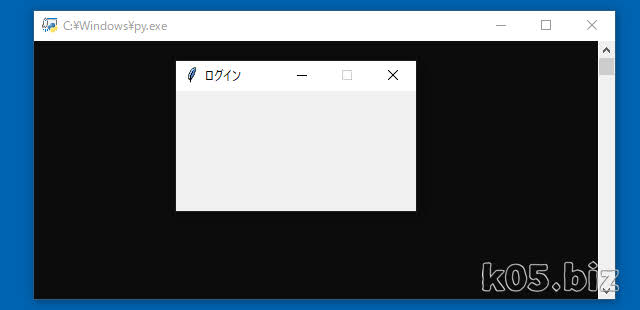
Windows表示まで
import tkinter as tk

#===========================
# メイン 関数
#===========================
def main():

   #-----------------------
   # Window作成
   #-----------------------
   root = tk.Tk()
   root.title("ログイン")
   root.geometry("240x120")

   root.resizable(False, False)


   #-----------------------
   # イベント待機
   #-----------------------
   root.mainloop()


#===========================
# 実行
#===========================
main()
まずは、Windowの表示までです。「root.resizable(False, False)」で、Windowsのサイズを変更できないようにしています。
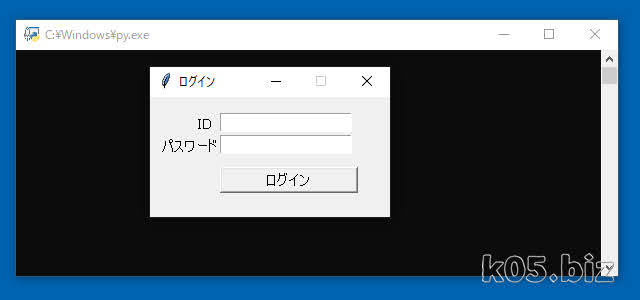
画面レイアウト表示まで
import tkinter as tk

#===========================
# メイン 関数
#===========================
def main():

   #-----------------------
   # Window作成
   #-----------------------
   root = tk.Tk()
   root.title("ログイン")
   root.geometry("240x120")

   root.resizable(False, False)


   #-----------------------
   # フォント指定
   #-----------------------
   root.option_add('*Label.font', ["MS UI Gothic",11])
   root.option_add('*Entry.font', ["MS UI Gothic",11])
   root.option_add('*Button.font', ["MS UI Gothic",11])


   #-----------------------
   # ラベル
   #-----------------------
   label1 = tk.Label(root)
   label1["text"] = "ID"
   label1.place(x=45,y=16)

   label2 = tk.Label(root)
   label2["text"] = "パスワード"
   label2.place(x=9,y=38)


   #-----------------------
   # テキストボックス
   #-----------------------
   textbox1 = tk.Entry(root)
   textbox1["width"] = 16
   textbox1.place(x=70,y=16)

   textbox2 = tk.Entry(root)
   textbox2["width"] = 16
   textbox2["show"] = '*'
   textbox2.place(x=70,y=38)


   #-----------------------
   # ボタン
   #-----------------------
   button1 = tk.Button(root)
   button1["text"] = "ログイン"
   button1["width"] = 16
   button1.place(x=70,y=70)


   #-----------------------
   # イベント待機
   #-----------------------
   root.mainloop()


#===========================
# 実行
#===========================
main()
ウィジェットの配置には、「pack、grid、place」がありますが、座標指定で配置したい場合は、placeを使います。
label1.place(x=45,y=16)のように、座標指定で配置できるので、VB(VBA)ライクに配置できます。
ボタンのクリックイベントの処理を書く

import tkinter as tk

#===========================
# ボタン clickイベント関数
#===========================
def button1_click():
   print("button1_click")
   print(textbox1.get())
   print(textbox2.get())

#===========================
# メイン 関数
#===========================
def main():
   global root
   global textbox1
   global textbox2


   #-----------------------
   # Window作成
   #-----------------------
   root = tk.Tk()
   root.title("ログイン")
   root.geometry("240x120")

   root.resizable(False, False)


   #-----------------------
   # フォント指定
   #-----------------------
   root.option_add('*Label.font', ["MS UI Gothic",11])
   root.option_add('*Entry.font', ["MS UI Gothic",11])
   root.option_add('*Button.font', ["MS UI Gothic",11])


   #-----------------------
   # ラベル
   #-----------------------
   label1 = tk.Label(root)
   label1["text"] = "ID"
   label1.place(x=45,y=16)

   label2 = tk.Label(root)
   label2["text"] = "パスワード"
   label2.place(x=9,y=38)


   #-----------------------
   # テキストボックス
   #-----------------------
   textbox1 = tk.Entry(root)
   textbox1["width"] = 16
   textbox1.place(x=70,y=16)

   textbox2 = tk.Entry(root)
   textbox2["width"] = 16
   textbox2["show"] = '*'
   textbox2.place(x=70,y=38)


   #-----------------------
   # ボタン
   #-----------------------
   button1 = tk.Button(root)
   button1["text"] = "ログイン"
   button1["width"] = 16
   button1["command"] = button1_click
   button1.place(x=70,y=70)

   #-----------------------
   # イベント待機
   #-----------------------
   root.mainloop()


#===========================
# 実行
#===========================
main()
button1["command"] = button1_click で、ボタンのクリック時に処理する関数を指定します。で、def button1_click():で、実際に処理したい内容を記述します。
あと、外部から参照するために、「global root、global textbox1、global textbox2」のように、global 指定しています。たぶん、あまりよくない実装なのかもと思う。クラス化すれば解消はできるとは思う。
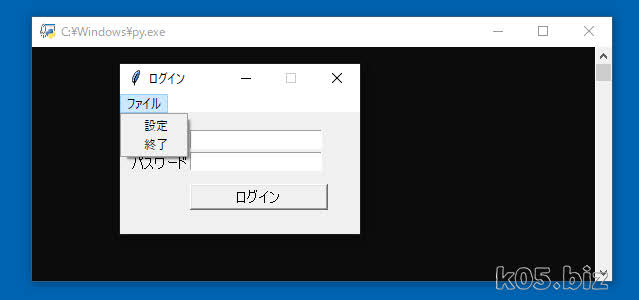
メニューバーを追加する
import tkinter as tk

#===========================
# ボタン clickイベント関数
#===========================
def button1_click():
   print("button1_click")
   print(textbox1.get())
   print(textbox2.get())

#===========================
# メニュー clickイベント関数
#===========================
def menu_end_click():
   print("menu_end_click")
   root.destroy()

#===========================
# メイン 関数
#===========================
def main():
   global root
   global textbox1
   global textbox2


   #-----------------------
   # Window作成
   #-----------------------
   root = tk.Tk()
   root.title("ログイン")
   root.geometry("240x120")

   root.resizable(False, False)


   #-----------------------
   # フォント指定
   #-----------------------
   root.option_add('*Label.font', ["MS UI Gothic",11])
   root.option_add('*Entry.font', ["MS UI Gothic",11])
   root.option_add('*Button.font', ["MS UI Gothic",11])


   #-----------------------
   # ラベル
   #-----------------------
   label1 = tk.Label(root)
   label1["text"] = "ID"
   label1.place(x=45,y=16)

   label2 = tk.Label(root)
   label2["text"] = "パスワード"
   label2.place(x=9,y=38)


   #-----------------------
   # テキストボックス
   #-----------------------
   textbox1 = tk.Entry(root)
   textbox1["width"] = 16
   textbox1.place(x=70,y=16)

   textbox2 = tk.Entry(root)
   textbox2["width"] = 16
   textbox2["show"] = '*'
   textbox2.place(x=70,y=38)


   #-----------------------
   # ボタン
   #-----------------------
   button1 = tk.Button(root)
   button1["text"] = "ログイン"
   button1["width"] = 16
   button1["command"] = button1_click
   button1.place(x=70,y=70)


   #-----------------------
   # メニューバー
   #-----------------------
   menubar1  = tk.Menu(root)
   root.config(menu=menubar1 )

   menu_file = tk.Menu(menubar1, tearoff=0)
   menubar1.add_cascade(label='ファイル', menu=menu_file)

   menu_file.add_command(label='設定')
   menu_file.add_command(label='終了', command = menu_end_click)

   #-----------------------
   # イベント待機
   #-----------------------
   root.mainloop()


#===========================
# 実行
#===========================
main()
クラス化
https://docs.python.org/3/library/tkinter.html
上記の「A Simple Hello World Program」というサンプルを参考にして、クラスを使った書き方に変更してみます。
ネットで見かける解説の多くは、上記のサンプルをベースに書いていると思います。
import tkinter as tk
#===========================
# Application クラス
#===========================
class Application(tk.Frame):
   #-----------------------
   # コンストラクタ
   #-----------------------
    def __init__(self, master=None):
        super().__init__(master)

        master.title("ログイン")
        master.geometry("240x120")

        master.resizable(False, False)

        master.option_add('*Label.font', ["MS UI Gothic",11])
        master.option_add('*Entry.font', ["MS UI Gothic",11])
        master.option_add('*Button.font', ["MS UI Gothic",11])

        self.create_widgets(master=master)
   #-----------------------
   # ウィジェット 生成
   #-----------------------
    def create_widgets(self,master):

        self.label1 = tk.Label(master)
        self.label1["text"] = "ID"
        self.label1.place(x=45,y=16)

        self.label2 = tk.Label(master)
        self.label2["text"] = "パスワード"
        self.label2.place(x=9,y=38)

        self.textbox1 = tk.Entry(master)
        self.textbox1["width"] = 16
        self.textbox1.place(x=70,y=16)

        self.textbox2 = tk.Entry(master)
        self.textbox2["width"] = 16
        self.textbox2["show"] = '*'
        self.textbox2.place(x=70,y=38)

        self.button1 = tk.Button(master)
        self.button1["text"] = "ログイン"
        self.button1["width"] = 16
        self.button1["command"] = self.button1_click
        self.button1.place(x=70,y=70)

        self.menubar1  = tk.Menu(master)
        master.config(menu=self.menubar1 )

        self.menu_file = tk.Menu(self.menubar1, tearoff=0)
        self.menubar1.add_cascade(label='ファイル', menu=self.menu_file)

        self.menu_file.add_command(label='設定')
        self.menu_file.add_command(label='終了', command = master.destroy)
   #-----------------------
   # ボタン clickイベント
   #-----------------------
    def button1_click(self):
        print("button1_click")
        print(self.textbox1.get())
        print(self.textbox2.get())

#===========================
# メイン 関数
#===========================
def main():
    root = tk.Tk()
    app = Application(master=root)
    app.mainloop()

#===========================
# 実行
#===========================
main()
ほとんど、書いてる内容は変わりませんけどね。クラス化が分からないのなら、スルーして、別に好きなように書けばよいと思います。
動画での説明
動画のように、少しずつコードを追加しながら、理解していくのがお勧めかも。
スポンサーリンク


